WIP Accruals
WIP Accruals allow users to add an 'estimate to complete' entry for time that is either unapproved or not entered at the time of billing, thereby allowing the control of profit or loss.
For example, if a particular Job is complete and a final bill is required but one employee has not completed their timesheet, it is possible to create the bill and just write out the current WIP. This will reflect a profit or loss that does not include all time entries. When the missing entry is eventually posted and approved, a zero value bill will be raised to write off this amount. This may be in a different accounting period. Creating an Accrual ensures that the profit or loss is accounted for in the correct accounting period.
The WIP Accruals window is accessed by clicking WIP Accruals on the Detailed WIP Allocation tab toolbar.

Each of the tabs in this window provides a means to create an accrual.
- In the General tab, you can enter an amount to accrue without assigning that amount to any Staff member.
- In the Staff tab, you can enter an amount to accrue that is assigned to a selected Staff member.
- In the Unapproved Entries tab, you can create an accrual based on an unapproved time transaction.
All three tabs include the following:
- Client / Job - These details are read-only, displayed for confirmation.
Complete the remaining details of the accrual in the appropriate tab, before clicking OK to post the accrual.
The Staff and Unapproved Entries tabs are described below.
To create a general accrual, in the General tab (illustrated above), complete the following details:
-
Charge Account - Select the relevant charge account for this accrual.
If there is only one charge account, it is selected by default.
- Time / Expense - This toggle is read only. It defaults to reflect the type of Charge Account you have selected.
- Date - Click the calendar control to select the accrual's active date. This can be any date on or before the bill date. If the bill date is not assigned until the bill is approved, it will default to the current (today's) date.
- Amount - Enter the amount to be accrued.
- Details - Optionally, enter a brief annotation of the accrual.
When you are ready to post the accrual:
-
Click OK .
The WIP Accrual window is closed automatically.
A new row representing the accrual is added to the lower WIP breakdown grid in the Detailed WIP Allocation tab, and the accruals are automatically allocated (written out) in the bill.
Once the bill amount and any other WIP has been allocated, the closing balance will always include the contra (negative) transaction created at the same time as the positive accrual, leaving this amount to be used in the next bill created for the same Client/Job.
Staff Accrual
To create an accrual that is assigned to a Staff member, select the Staff tab:
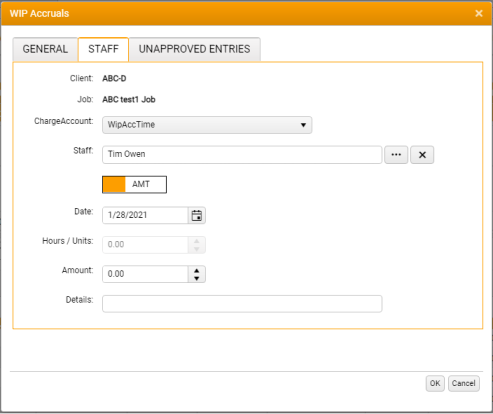
... and complete the following details:
-
Charge Account - Select the relevant charge account for this accrual.
If there is only one charge account, it is selected by default.
- Staff - Select the Staff member to whom the accrual will be assigned. Defaults to the current user. To select an alternative Staff member, click the ellipsis button to display the Staff Selector.
- HRS / AMT - Click the toggle switch to specify how the accrual will be entered, by Hours or units, or by Amount. This determines which of the respective fields below is editable.
- Date - Click the calendar control to select the accrual's active date. This can be any date on or before the bill date. If the bill date is not assigned until the bill is approved, it will default to the current (today's) date.
- Hours / Units - Enter the enter the hours or units to be accrued. The value of the hours is calculated on Rate 1 for the selected Staff member.
- Amount - Enter the amount to be accrued.
- Details - Optionally, enter a brief annotation of the accrual.
To post the accrual, click OK , as described above.
Unapproved Entries Accrual
To create an accrual that is based on unapproved time transaction, select the Unapproved Entries tab:

... and complete the following details.
-
Charge Account - Select the relevant charge account for this accrual.
If there is only one charge account, it is selected by default.
- Date - Click the calendar control to select the accrual's active date. This can be any date on or before the bill date. If the bill date is not assigned until the bill is approved, it will default to the current (today's) date.
- Amount - Read-only. To determine the amount to be accrued, select the appropriate time entry in the grid below; the Amount is then populated automatically.
- Details - Optionally, enter a brief annotation of the accrual.
To post the accrual, click OK , as described above.