Initial Due Dates and Due Date Extensions
Each step's Initial Due Date is displayed in all Due Dates grids. This is the original calculated Due Date, excluding Due Date Extensions and any Assigned Staff adjustments.
Extending a Due Date
To extend a step's Due Date:
-
Right-click within the appropriate row in the Active Due Dates grid and select Extend.
This displays the Extend Due Date dialogue.
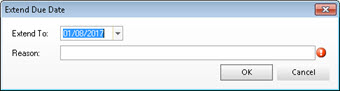
Here you can change the step's due date, subject to the extension rules defined for the step in the template, as described in the Templates section of this document (see Templates / Steps / Extensions).
In the Extend Due Date dialogue:
- Extend To - Either select a Rigid Extension or, in the case of a Flexible Extension, select a new due date from the calendar.
-
Reason - Record the reason for the Extension.
It may be mandatory to enter a Reason. This is governed by a Firm Switch.
- Click OK to activate the extension.
If there are no extensions defined in the template for the current step, or if the step has already been extended to the maximum defined in the template, then the appropriate warning dialogue is displayed.
Reversing an Extension
It is possible to reverse Extensions.
Reversals must be performed either in the Client or Job Details screens, or in the Edit Due Date Process screen. They cannot be performed in the Active Due Dates screen.
Reversals are performed in reverse sequence, i.e. starting with the most recent Extension. Repeated reversals work backwards until no Extensions remain on the Step.
Deleting an Extension
To delete an Extension:
-
Select the relevant Extension row in the Active Due Dates grid and press Delete on your keyboard.
You are prompted to confirm the deletion.