The Job Selector and Job List Selector
There are multiple Job Selectors in this module:
-
The Job Selector is displayed as the first step in the creation of a new budget. It allows you to select the specific Job for which you want to create a budget. It is accessed by clicking New Budget in the main toolbar.
The Job Selector returns only those Jobs currently without a budget or mini-budget.
- The Job List Selector allows you to populate the Job Budgets tab by locating and selecting one or more Job Budgets to work on. It is accessed by clicking Select Jobs in the main toolbar.
-
The Job Selector - Budget Prior Year allows you to select the Job with the prior year budget that you want to use as the basis for a new budget. It is accessed either when creating a Prior Year Job Link during Budget Setup, or by clicking Edit in the Budget Basis region of the Selected Budget Details sub-tab.
When Entity-level Functional Currency functionality is enabled, The Job Selector - Budget Prior Year searches only for Jobs with the same Entity currency as either the Target Job's Entity currency (when creating a Budget), or the current Job Budget (when editing a Budget Basis).
The various Job selectors are identical, except that the Job List Selector allows you to select multiple Jobs, displaying a preview of those selections in an additional frame to the right (illustrated below).
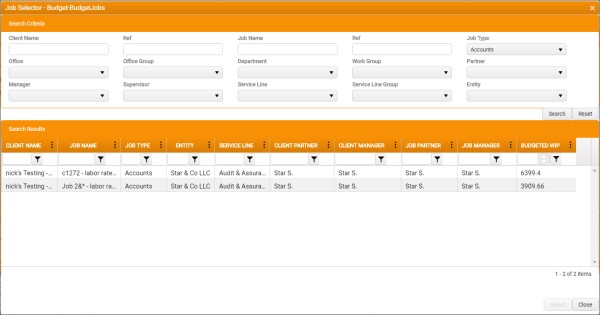
To enter a Job search:
- Enter any appropriate Search Criteria that would help to narrow the search.
-
Click Search .
Any matching Job records that match the Search Criteria you entered are displayed in the Search Results .
Entity and service line filtering is applied by default. In your organisation's implementation, stored procedures might be used to apply additional levels of filtering. In the Budget Prior Year selector, for example, restrictions may specify that the Prior Year Job must be of the same Type as the current budget's Job.
You can organize the Search Results by applying Column Sorting and Filtering.
You can also clear individual Search Criteria, enter additional Search Criteria and click Search again, or click Reset to clear all Search Criteria and begin again.
- Select the Job from the Search Results .
-
In the Job Selector, click Select . The Job Selector is closed and the Budget Setup window is displayed automatically as the next step in the budget creation.
In the Job List Selector, click Add . The selected Job is added to the Selected Jobs grid on the right. You can then search for and add further Jobs, as required, before closing the Job List Selector and populating the Job Budgets tab with details of the Selected Jobs.
Selected Jobs (in Job List Selector)
In the Job List Selector only, the Selected Jobs grid on the right (the Job List) displays a preview of any Jobs selected from the Search Results . You can then search for and add further Jobs, as required.
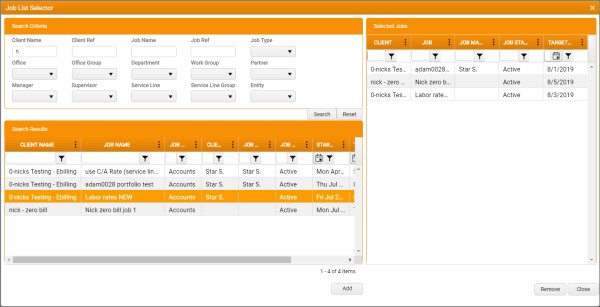
To remove a Job from the Selected Jobs list, simply select it and click Remove. There is no prompt for confirmation.
When you have selected all of the relevant Jobs, click Close. The Job List Selector is closed, and the Job Budgets tab is populated with details of the Selected Jobs.