Creating or Editing Receipts
The Receipt details window allows you to enter and maintain the details of an individual Receipt.
Batch Receipts can be amended at any time until the Batch is approved, but not thereafter.
To add one or more new Receipts to a Batch:
-
In the Batch Tab Item List, click New.
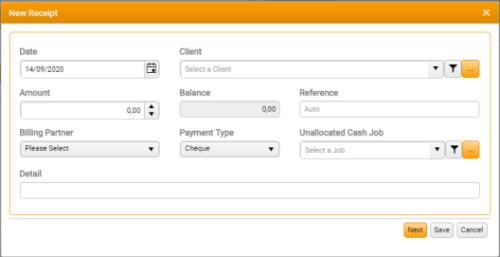
This displays the New Receipt window, in which you can define the values for one or more new Receipts. Values are either undefined or set to defaults.
To edit an existing Receipt:
-
Select the Receipt in the Item List and click Edit.
This displays the Edit Receipt window, in which you can amend the details of the selected Receipt. Values are as previously defined.
The New and Edit Receipt windows both display the same controls, with one exception. Only the New Receipt window displays a Next button, which allows you to define multiple Receipts before closing the window.
In this screen:
- Receipt Date - If posting to a full receipts batch, the Receipt Date defaults to the posting date defined on the batch; for all other batches, defaults to the system date. To select an alternative date, click the calendar icon to display a date picker.
-
Client - Select or search for the relevant Client.
Apply Quick Search Filter options, then click the ellipsis button [...] to display the Client Selector.
Once a Client is selected, the current Balance for that Client is displayed automatically.
If the current status of the Client you select is Suspended, the text (SUSPENDED) is appended to the Client name.
- Amount - Enter the amount for this Receipt.
-
Balance - The sum of outstanding balances for the selected Client. (Populated automatically on Client selection.)
Where the Balance control is relabelled Balance (All Entities), this indicates that Receipts Cross Entity functionality is active in your organisation's implementation of AR.
-
Receipt Reference - Optional. Enter a short identifying reference for the new Receipt.
If Auto-Referencing is enabled the Receipt Reference field defaults to Auto. This can be overtyped. If it is accepted, the system will automatically create a reference for the Receipt.
-
Billing Partner - Optional. Select the Partner responsible for the remaining balance on the Receipt. Selection may be restricted either to Partners that can see the Batch Entity or Partners that are on Jobs that belong both to the Client and to the Batch Entity.
If no Billing Partner is selected, defaults to the Partner for the selected Job .
May not be availabale in your organisation's implementation.
- Payment Type - Optional. Payment Types are user-defined.
-
Unallocated Cash Job - Optional. Select the Job to which to post the remaining balance on the Receipt.
This drop-down is automatically filtered to include only Jobs that belong to the Client being posted to and the Ledger the Batch is for. If Cross Entity functionality is active in your organisation's implementation, and the Receipt is for an Invoice in an Entity other than the Batch Entity, this will include Jobs across all Entities.
Requires the relevant User Privilege. The option may be unavailable in your organisation's implementation.
In some implementations, a dialog is displayed to any user who partially allocates a receipt that they must allocate the as-yet unallocated cash to a Job. In the Item List, values in the Remaining column are rendered in red until all unallocated cash has been allocated to a Job, at which point they revert to black.
Apply Quick Search Filter options, then click the ellipsis button [...] to display the Client Selector.
- Detail - Optional. Enter any comments regarding the Receipt.
Button Functions
-
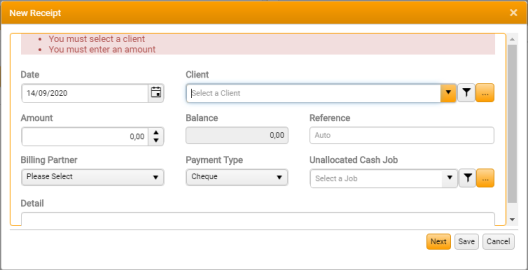
Next - Validates the current Receipt, and clears all inputs so you can define another.
Available only in the New Receipt window.
If all inputs pass validation the Item List is updated and the New Receipt screen is cleared for the next Receipt.
If any input fails validation, focus remains on the current Receipt and a warning prompt indicates which values failed validation.
-
Save - Validates and saves your changes.
The window is closed automatically. If you are editing a Receipt, its details are updated in the Item List. If you are adding Receipts, a new entry for each is inserted into the Item List.
-
Cancel - Closes the window with no save or validation.