Create or Edit a Tabular Report
The creation and subsequent editing of Tabular Reports is guided by a two step wizard.
In the Tabular Report List, either:
- Click New to display the Create Tabular Report wizard, or
- Click Edit to display the Edit Tabular Report wizard.
Although their layouts are slightly different, the elements of both wizards are the same.
The first step is to create the report's listing and define the connection with its data source (Query Definition). In the next step, the report's columns are defined. The report can then be previewed.
If you want only to edit column details, click Next on proceed directly to that screen (Step 5 below).
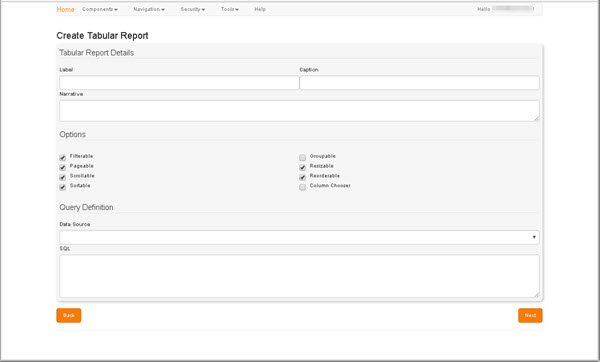
- In the Tabular Report Details region, define the details by which the report will be identifiable:
- Label: Enter a meaningful name or short description for the new report. This will be displayed as the report's Description, e.g. in the Description column within the Tabular Report List.
- Caption: Enter a short caption for the report. The Caption is displayed within screen headers when the report is being edited. If no Label is specified, the Caption is used in its place.
- Narrative (Optional): Enter a concise description of the report. This will be displayed beneath the Caption in, e.g., the Layout screen.
- In the Options region: Select only those checkboxes for the navigation and custom view options that you want to apply to the report:
- Filterable
- Pageable
- Scrollable
- Sortable
- Groupable
- Resizable
- Reorderable
- Column Chooser.
- In the Query Definition region:
- Data Source: Select the data source you want to report on.
-
SQL: Enter the SQL parameters that will be used to query the specified data source and drive the report.
The SQL field is not case-sensitive.
-
Click Next to progress to the next screen, Column List.
The SQL you entered in the Query Definition is validated at this point. If validation fails for any reason, an error message is displayed beneath the SQL field, e.g. "SQL incorrectly specified - Unable to build the embedded [Parameter] collection: ...". Any elements you include in these parameters will subsequently be listed, and can be formatted via the Element List.
The Column List screen presents a grid, each row of which represents a parameter specified in the Query Definition SQL in the previous screen. Each parameter is mapped to a field represented by a column in the report, which must be formatted.
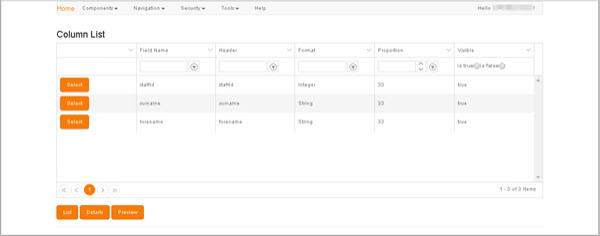
Of the buttons in this screen:
- List - Returns you to the Tabular Report List.
- Details - Displays the Tabular Report Details screen in a new tab.
-
Preview - Displays a preview of the report in a new tab.
Report previews are dependent on Group Privileges. If you do not have the required privilege, the tab will display 'Access Denied!' and the relevant Component ID.
- To locate a specific column, use either the filters in the column headers or the scroll bar and the page navigation controls in the grid footer (for details, see Column Filters and Page Navigation).
-
To change a column's details, click Select on the appropriate row to display the Column Details region beneath the Column List.
To then view the details of a different column, simply click Select on the appropriate row to toggle the view in the Column Details region.
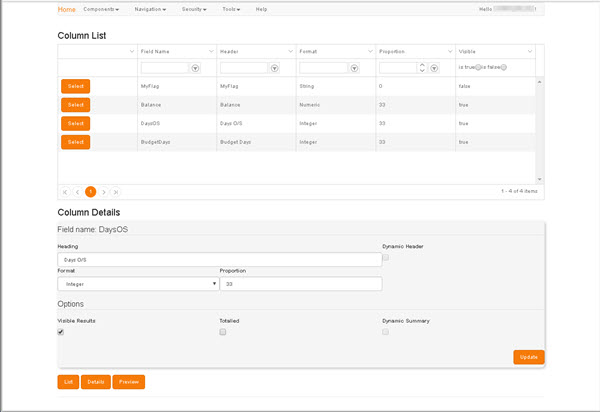
- In the Column Details: Field Name region:
- Heading: Enter the column heading.
-
Dynamic Header: If you want the header to be dynamic (e.g. if you want to use an image file), select this checkbox.
If the Dynamic Header option is not available the cursor will toggle to a 'stop' icon when you attempt selection.
- Format: Select the appropriate value format (Numeric, Currency, Date, etc.) from the drop-down control.
- In the Column Details: Options region, select the checkbox for any option that you want to apply:
- Visible Results
- Totalled
- Dynamic Summary.
- Click Update to preserve your changes.
-
Click Save.
The new report is created, and you are returned to the Tabular Report List automatically.
To return to the Tabular Report List without making any changes, click Back.